Build a Fantasy Map From AI Map Pieces
A layer-based GIMP workflow for arranging separately generated map pieces and using a fixed blank repair tile, so an image generator fills only the gaps between them without redrawing your existing buildings.
What this workflow does
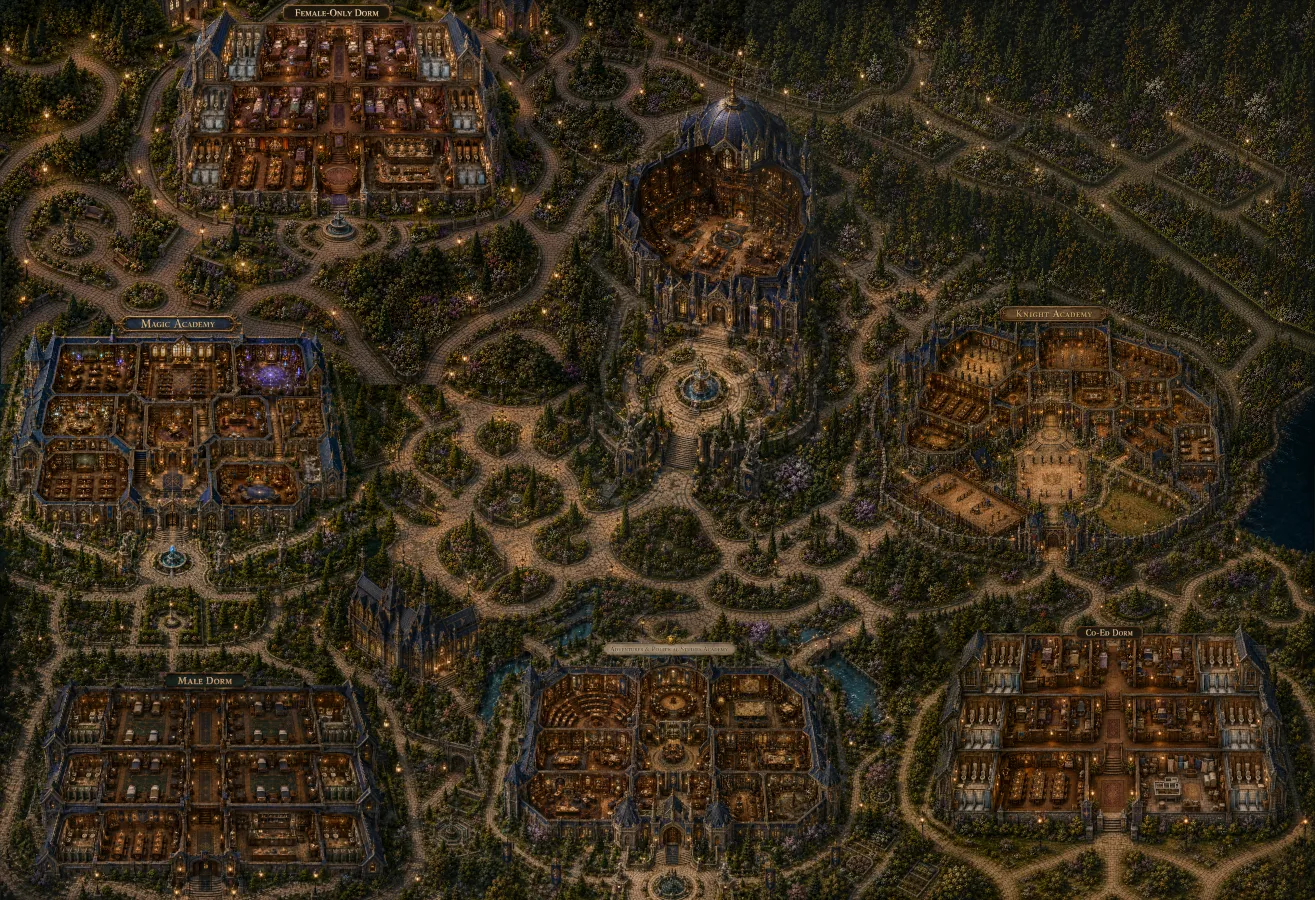
Instead of asking an image generator for one enormous, perfectly coherent map in a single pass, build the map from focused pieces: individual dormitories, academy interiors, courtyards, libraries, training grounds, and other major landmarks. Arrange those pieces in an image editor, then use a controlled blank rectangle to generate only the connective scenery between them.
The key idea is simple: the image editor controls placement; the image generator only supplies the transition terrain. That stops the model from quietly relocating your buildings, because spatial continuity is still an optional hobby for a lot of image models.
The steps use GIMP, but the approach ports to Photoshop or Paint.NET — anything with layers and a configurable grid.
Before you start
- Keep every original image file untouched in a source folder.
- Create one large working canvas for the full map.
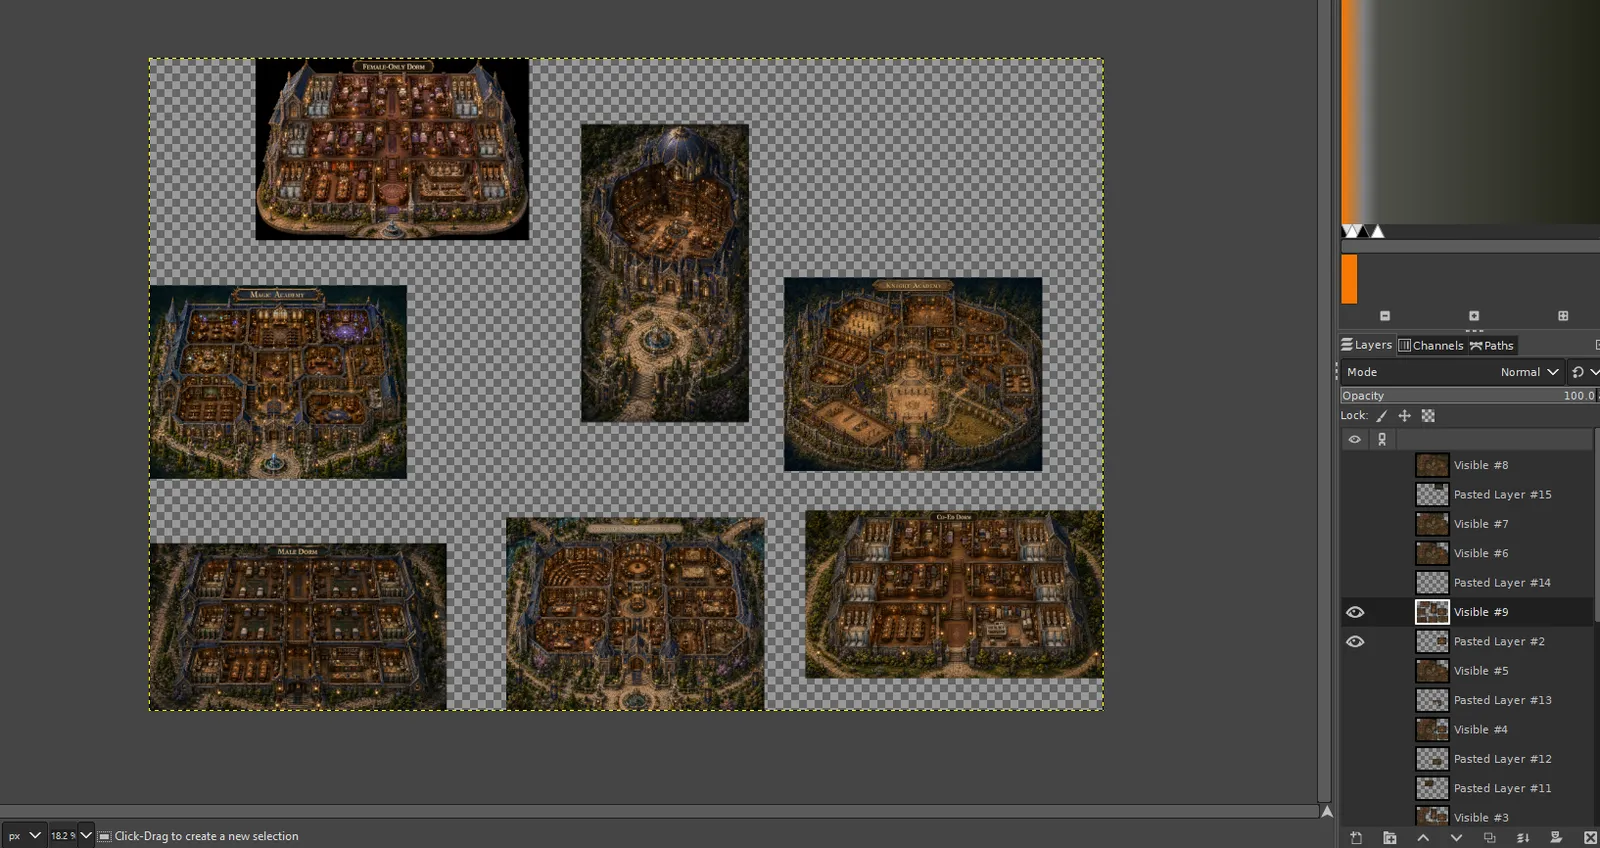
- Import each section as a separate layer.
- Use transparent space, not painted-over pixels, between sections.
- Lock completed layers once they are placed.
- Name layers clearly:
Magic Academy,Dormitory,Library,Courtyard Fill 01. - Save a layered
.xcfproject before every major fill pass. - Work in PNG, never JPEG, while assembling.
Pick a fixed repair-tile size
For the repair images in this workflow, use 1537 × 1023 px and treat it as your fixed AI repair tile; set your editor grid to match. Use the exact pixel dimensions rather than a rounded aspect-ratio label — matching the requested generation size matters more than a tidy nickname, and 1537 × 1023 is not actually 16:9.
Step-by-step
1. Concept the full location first
Decide what the finished map needs to communicate before generating anything. Note the major zones, how they connect, which buildings need interior cutaways, and what stays scenic. For an academy that might be dorms, magic and knight academies, a grand library, training grounds, gardens, courtyards, river paths, and gateways. Think in terms of player movement: where would someone walk between places, where do paths join, and which locations need room around them for later story events?
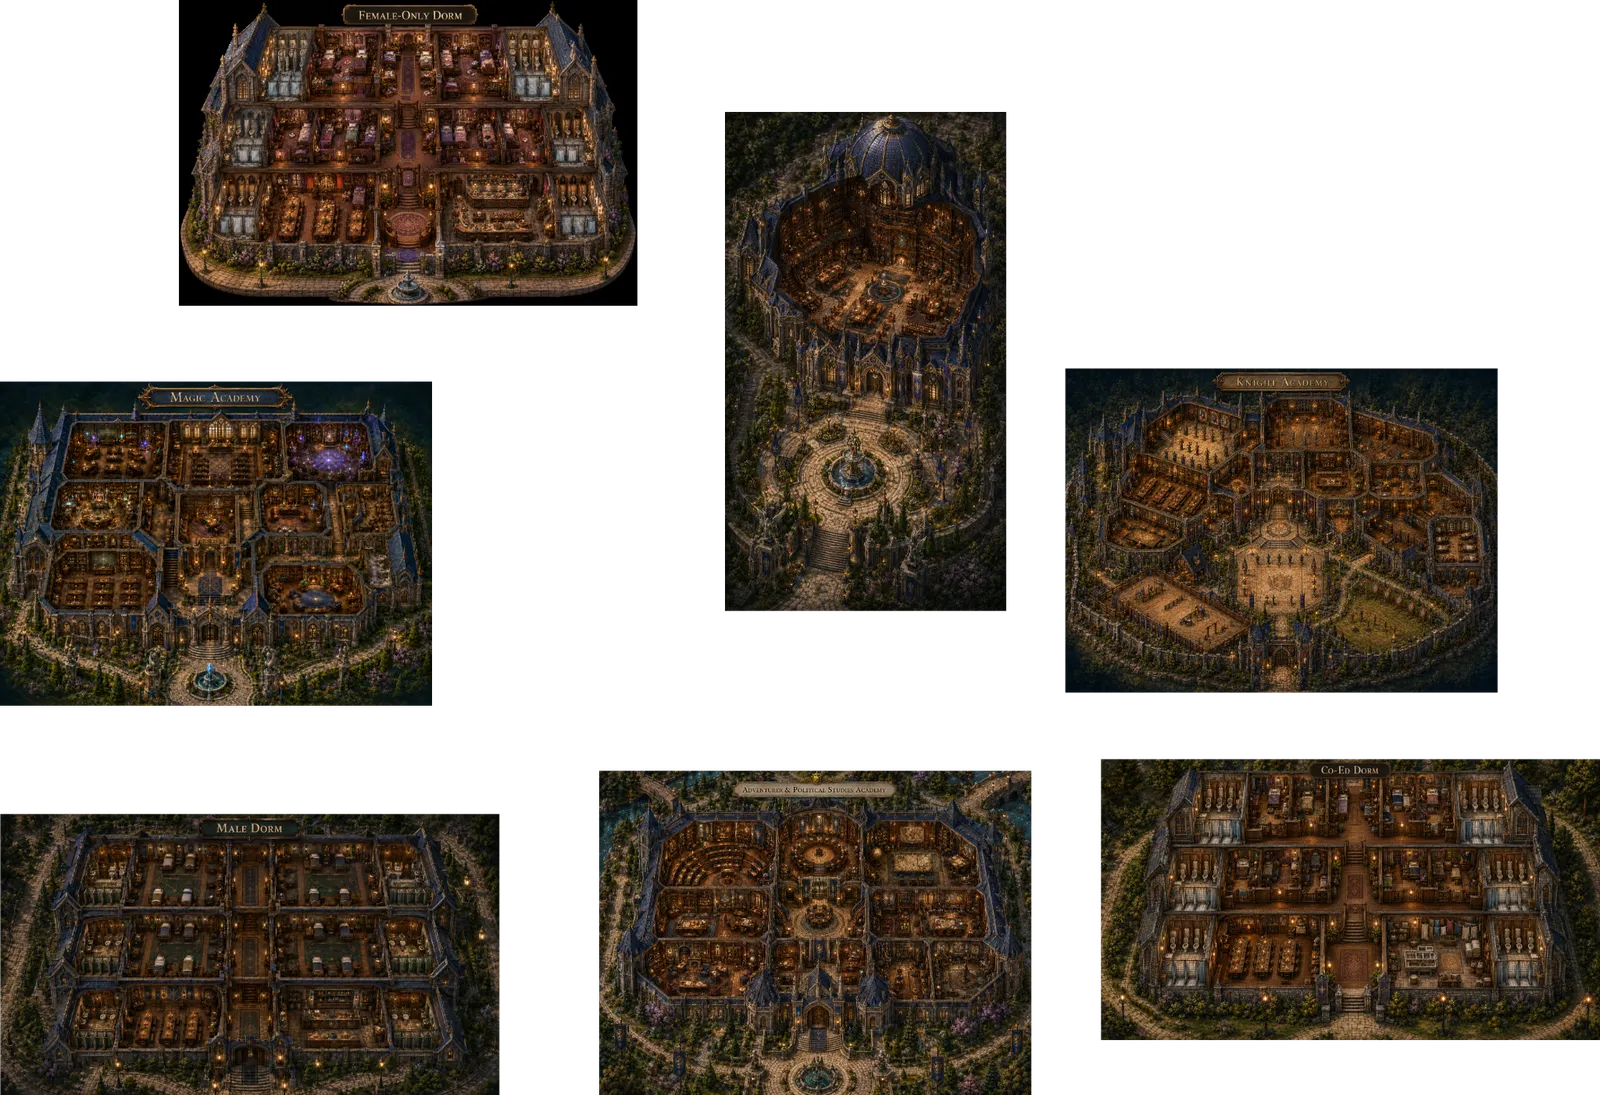
2. Break the concept into individual map pieces
Use image-to-image or reference-plus-prompt generation to isolate the important parts one at a time, rather than asking for the whole campus repeatedly. Give each piece a clear job: a dorm exterior and interior cutaway, a library and courtyard, academy rooms, practice grounds, a garden connector. Match the existing visual language on every new piece: same isometric angle, stone and roof colours, warm dusk lighting, garden density, path width, and scale.
3. Repeat until you have the major landmarks
Build the collection before attempting the large map. You want enough pieces to establish the identity of the place, but not so many that there is no room left for connective terrain. Keep each landmark as its own image so you can swap it later without rebuilding everything.
4. Create a large empty project canvas
In GIMP, File → New a transparent canvas larger than the finished map. Oversize it at first — the extra space lets you move locations around before committing to a crop. Set the background to transparency.
5. Paste each landmark as its own layer
Import every piece with File → Open as Layers. Use the Move tool set to move the active layer, keep labels and interior cutaways intact, and arrange the landmarks where they make geographic sense, leaving intentional gaps for gardens, tree belts, roads, and plazas. Do not merge layers yet — you will need the sources if a fill pass creates a bad seam or nudges an adjacent edge.
6. Turn on the grid and snapping
View → Show Grid and View → Snap to Grid, then configure it through Image → Configure This Grid. The grid keeps your export rectangles consistent and stops hand-dragging from slowly turning the campus into an architectural fever dream.
7. Set the grid to the repair-tile size
Set grid spacing to 1537 px horizontal and 1023 px vertical, with visible lines or intersections — whichever is easier to work with. Every grid cell now represents one repair-sized image.
8. Offset the grid to frame one repair area
Adjust the grid offset in Image → Configure This Grid until a rectangle contains the gap you want to repair and overlaps the surrounding landmarks enough to preserve continuity — ideally showing existing map edges on at least two sides. This is the important trick: you are not generating a generic garden, you are handing the generator two or more existing fragments that it has to bridge.
9. Copy the complete repair rectangle
With the Rectangle Select tool snapped to the grid, select exactly one 1537 × 1023 tile. Use Edit → Copy Visible so the copy includes every visible layer in that rectangle, paste into a new image, and export it as PNG. Keep the blank areas blank or black and the existing structures clearly visible — the generator cannot preserve what it cannot see.
10. Use a strict inpainting instruction
Upload the tile and tell the generator to preserve all existing pixels and fill only the blank space. State the exact output size, the allowed scenery, and the restriction against adding or moving buildings. Use the repair prompt below as a reusable baseline.
11. Paste the repaired tile back into the project
Import the returned image as a new layer above the source layers and align it to the same grid cell. Lower its opacity briefly to check that original buildings, signs, fountains, and paths still line up. If it fits, mask or erase only the original blank area beneath it and keep the repair layer. If it does not fit, do not force it — re-export the same tile and revise the wording. Common fixes are stronger "do not alter existing structures" language, fewer requests, or a smaller blank gap.
12. Repeat for each blank region
Repair one gap at a time, working from the largest, most central spaces outward, then finish smaller seams with trees, paths, hedges, flower beds, lamps, fences, bridges, or water. Preserve your layered master file throughout. The result is a large, readable map that is easy to crop into individual location-sized game spaces later.
Reusable blank-space repair prompt
Use this when the only change you want is filling the empty region between established map pieces:
Use this exact image only! Fill in the blank sections; do not add extra labels. Keep the image ratio and size at 1537×1023 px exactly, and preserve every existing structure and feature in its exact position. Fill only the black or empty areas between the existing sections so they become part of the same coherent map. Use natural trees, landscaped gardens, and connected stone pathways. Do not add buildings. Do not move, redraw, crop, resize, recolor, or alter the existing buildings, interiors, labels, paths, fountains, or structures. Only fill the blank space. Double-check that all existing map pieces remain in their original positions.For a specific zone, change only the scenery sentence — for example "Fill the blank space with a formal courtyard, hedged gardens, and cobblestone paths," or "Fill the blank space with woodland paths, trees, flower beds, and a narrow stream." Keep the preservation language unchanged.
Troubleshooting seams and bad fills
| Problem | Fix |
|---|---|
| The AI moved a building. | Re-export with more surrounding context and repeat "preserve all existing pixels in exact positions." |
| The fill adds a new structure. | Explicitly say "no buildings, no towers, no walls, no new labels." |
| Paths do not meet. | Include more of the original path ends in the repair tile and request "continue existing paths naturally." |
| Colour or lighting shifts. | Describe the established palette: warm dusk lanterns, blue slate roofs, gold interior light, dark green gardens. |
| The returned image is slightly off-scale. | Do not stretch it. Regenerate with the exact size and a simpler fill request. |
| Edges are too noticeable. | Use a soft layer mask, or repair a wider tile with more overlap. |
Finish and export
When every blank region is repaired, save the layered master as an .xcf, then duplicate it for export. Merge only the duplicate, crop to the final map boundary, and export a PNG. Keep both versions for later game use:
- Master map: all source layers, repair layers, masks, and guides preserved.
- Game export: a flattened PNG for navigation, map slicing, or location art.
Save each repair tile with a numbered filename such as campus_fill_01.png. When a later edit breaks continuity, you can replace one tile instead of starting the whole map over.